Armstrong Hand Swages:
Tool Adjustment Operating Instructions

hs001.jpg (26399 bytes)


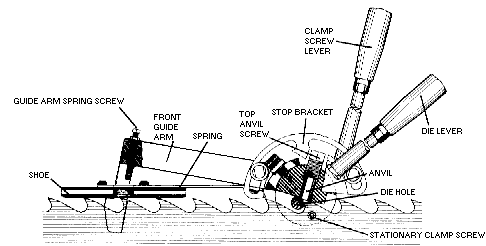
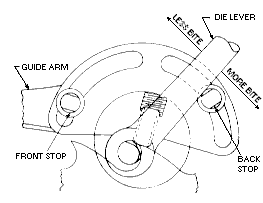
Set Die Lever For Bite
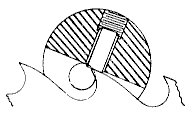
hs004.jpg (12719 bytes)

  1. Set swage on saw and line up eccentric part of die by eye so it will pick up about 1/8" or 3/16" of tooth.
  2. Set stop on stop bracket against die lever.
  3. Swage tooth.  NOTE: We recommend lubricating saw tooth face with oil, chalk or a combination of both prior to swaging.  Don't over lube or get oil on areas where clamp screws grip.
  4. Adjust stop for more or less bite.

Set Head To Tooth

006a.gif (2008 bytes)

  1. Set swage on saw.  Run saw through slot in swage head and rest shoe on saw tips.  Remove die from die hole and look to see if flat end of anvil is sitting flat on tooth with no light at either front or back of anvil.
  2. To adjust, loosen two screws holding guide arm and rotate head forward or backward until anvil sets flat on back clearance of tooth.
  3. Tighten screws in guide arm.  Recheck.


MANUFACTURING COMPANY
  5504 S 11th St, Ridgefield, WA 98642 USA
(503) 228-8381  Fax: (503) 228-8384
www.armstrongblue.com

Armstrong Hand Swages:Tool Adjustment Operating Instructions
Set Die Lever to End of Stroke
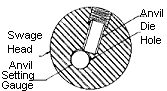
hs005.jpg (11791 bytes)


  1. Assemble die holder, handle and die holder nut snugly.
  2. Insert into die hole and rotate lever counter-clockwise until eccentric die contacts anvil.
  3. Slip die lever on die holder until a comfortable swaging position is reached.
  4. Remove lever and die assembly.  Tighten nut on die holder.  Then replace in die hole.  Mark die lever to correspond with split in die holder for ease of re-establishing setting and as a reference if die holder should slip in lever.
  5. Move die lever forward until eccentric die contacts anvil.
  6. Move die lever back slightly (about 1/16").  Set front stop by bringing it up against the die lever and tighten.
  7. It is important to set front stop to hold eccentric die away from face of anvil to avoid damage to die or anvil.
Set Front Guide Arm Spring Screw
003a.gif (5270 bytes) 1.  Set gap between end of the screw and guide arm spring if it is  desired to pull the tooth point down.
2.  Pulling point down will permit heavier grinding on
back of tooth, if necessary to maintain tooth shape.
Set Anvil To Gauge

setanvil-b.gif (4734 bytes)

  1. Make sure anvil gauge number corresponds with swage die.  Example: No. 77 swage die uses a 77-G anvil setting gauge.
  2. Insert anvil setting gauge into die hole.   Remove top anvil screw and insert anvil into anvil hole.  Tighten side anvil screw just until it will hold anvil from falling out of anvil hole.
  3. Make sure you can turn the anvil setting gauge freely.  Continue turning anvil setting gauge, and begin to tighten top anvil screw.   Tighten until you feel a slight "drag" on setting gauge, and stop.
  4. Remove anvil setting gauge.
  5. Tighten side anvil screw.

DESCRIPTION
Armstrong hand swages have been an important part of the filing room for literally decades. Each swage is made from the finest materials and assembled by experienced craftsmen -- providing filers the accuracy and dependability they require on the job. These tools, if kept clean and in good working order, will provide years upon years of good, reliable service. Armstrong offers a complete line of swages to accommodate an entire range of swage gauges and types. In addition, spare parts are available for every swage Armstrong manufactures.

Backed by nearly 100 years of service to the sawmill industry, and the commitment to stand behind every product we manufacture, Armstrong swages are the first choice of saw filers worldwide.

DIE SELECTIONS:

Long

The long bite die is the mildest die, and produces the smallest kerf.

Short

The short bite die is the most frequently used for "average" conditions.

Extra Short

The extra short die is the most aggressive, giving the heaviest kerf.


Armstrong Hand Swages: Tool Adjustment Operating Instructions 
MAINTENANCE

Armstrong swages require very little up-keep. The key to maintaining a good, accurate, reliable tool is weekly cleaning and lubricating with a dry, non-abrasive spray. (Oil and grease can trap grinding grit which can lead to premature wear.) Periodically check for looseness or wear, especially the swage die hole and clamp screw threads. Keep the clamp screws free of pitch.

Swages have a number of parts that are consumed during swaging and need to be replaced. Don't wait until you're having difficulties. Keep spare parts on hand and use carbide whenever possible. Carbide


parts last longer, work better and cost less in the long run.

Steel anvils can be used one time on each end. When the anvil is worn, flip it over "end-for-end" (do not rotate). Carbide anvils can only be used once, however, they will usually last 8-10 times longer than steel. When anvils wear down .001" (about the smallest amount you can "feel") send in to Armstrong for regrinding.

Wipe the swage die down and inspect for wear at least once a week. When the die shows signs of wear, move it over 1/4" (6mm) minimum.

WHAT IF?

WHAT IF I'M HAVING A PROBLEM WITH TOOTH BENDING OR UNEVEN SWAGING?
One of the first places to check is the sharpener. About 1/2 of all tooth bending/ uneven swaging problems result from grinding off-center or out-of-square.

If the problem occurs after you have been using the swage for a period of time, go back and reset-up the swage according to the instructions provided for the initial setup.

For more detailed information, refer to Armstrong's Swage and Shaper Troubleshooting Guide.

WHAT IF I'M SEEING SOME "BLURRING" IN MY CLAMP SCREW MARKS?
It's probably time to replace your clamp screws. When doing so, replace BOTH at the same time and send your anvil in for regrinding. Order carbide parts whenever possible. Also, check the clamp screws for pitch build up. They may just need a good cleaning.

A QUICK CHECK: Can you cut a donut? Check the clamp screws by sliding a piece of paper between them and apply light pressure. You should be able to cut a perfect donut shape. Do not clamp too tightly, or you could damage your clamp screws.

WARNING: You are working in a dangerous environment. To minimize risk of injury, keep work area clean and all tools in good working condition.


WHAT IF I'M NOT GETTING ENOUGH KERF?
Are you using the correct die size for your particular requirements? (Refer to die selection chart.) Is your tool adjusted to provide maximum kerf?

TO ADJUST THE ANVIL FOR MAXIMUM KERF:

  • set to the anvil setting gauge
  • back the anvil away from the die 1/4 turn on the top anvil screw
  • reset the front stop on the die lever to engage 1/16" before the die contacts the anvil

Most people will instinctively lower the anvil into the die in an attempt to increase kerf. Backing the anvil AWAY from the die and resetting the stop allows the die to "work" the saw for maximum kerf.

WHAT IF THE DIE HOLDER SLIPS INSIDE THE DIE LEVER CLAMPING SOCKET?
Remove or rough-up the plating on the inside of the die lever clamping socket with emery paper. Remove all the oil between the die holder and socket. Retighten.

For additional answers to commonly asked questions, refer to Armstrong's Swage and Shaper Troubleshooting Guide.